Staging a blog in Shopify is simple enough, but doing so in a manner that meets SEO best practices requires pre-planning and critical thinking.
With that in mind, following this multi-step process will help assure that any blog content will be properly optimized to rank well in Search Engine Results Pages (SERPs) and meet client standards.
Start With Keyword Strategy
This template should always be completed before you start writing the actual copy/content of any blog post.
The main tool we utilize for keyword research is MOZ.
With MOZ you can use the Keyword Explorer tool to look up any search term and determine the following characteristics:
-
- Monthly Search Volume (MSV) - How many times/month that term is searched for
- Difficulty - A score from 0 - 100 that estimates how difficult it would be to outrank competitors on page 1 of SERPs for that term.
- Organic CTR - The percentage of total clicks that come from organic (non-paid) sources for that term
- Priority - Aggregates the above characteristics to generate a score from 1 - 100 on the overall potential of the term (least useful of the 4 characteristics)
A solid focus keyword for a blog will typically meet the following standards:
-
- MSV higher than 200*
- Difficulty lower than 50
- Organic CTR higher than 70%
*Your target MSV may vary based on the competitive landscape of the industry your search term belongs too. For instance, search terms related to CBD average in the 1-3k searches per month, while more niche terms may be in the low hundreds.
Write SEO Optimized Meta Data
Meta Data includes your blog's meta description, title tags, and headlines.
These are all elements that are crawled by Google and help your blog rank higher in SERPs if they're properly optimized around your focus keyword.
Meta Description
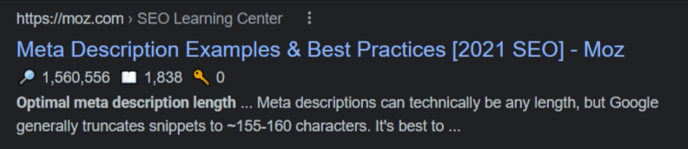
Your meta description is the section of text that shows up below the SEO Title in SERPS.
Meta descriptions should not exceed 160 characters, in order to avoid being cut off on the results page.
Additionally, your meta description should provide a brief but thorough description of what someone who clicks the blog URL can expect to learn from reading the article.
Always ensure that your focus keyword is placed in the meta description ATLEAST one time.
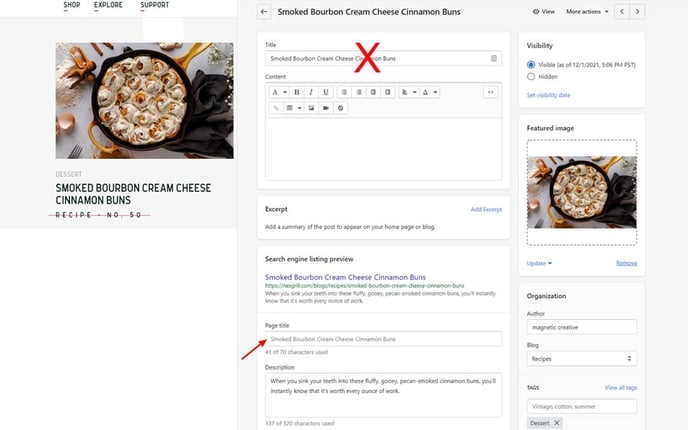
Where Does Your Meta Description Go in the Shopify Blog Editor?

Page Title & SEO Title: What's the Difference?
There are two titles associated with any Shopify blog: Page Title & SEO Title
The Page Title is the title that will show up within the Shopify store and appears on the blog landing page.
Where Does Your Page Title Go in the Shopify Blog Editor?

Unfortunately Shopify's editor can be confusing when differentiating where to place your Page Title vs SEO Title.
The top "Title" field is where you will place your Page Title, while the "Page title" field is actually where your SEO Title will go - frustrating, I know!
The SEO Title is the title that will appear in SERPs above your URL and Meta Description.
SEO Title length should never exceed 70 characters, and should always include your blog's focus keyword.
Where Does Your SEO Title Go in the Shopify Blog Editor?
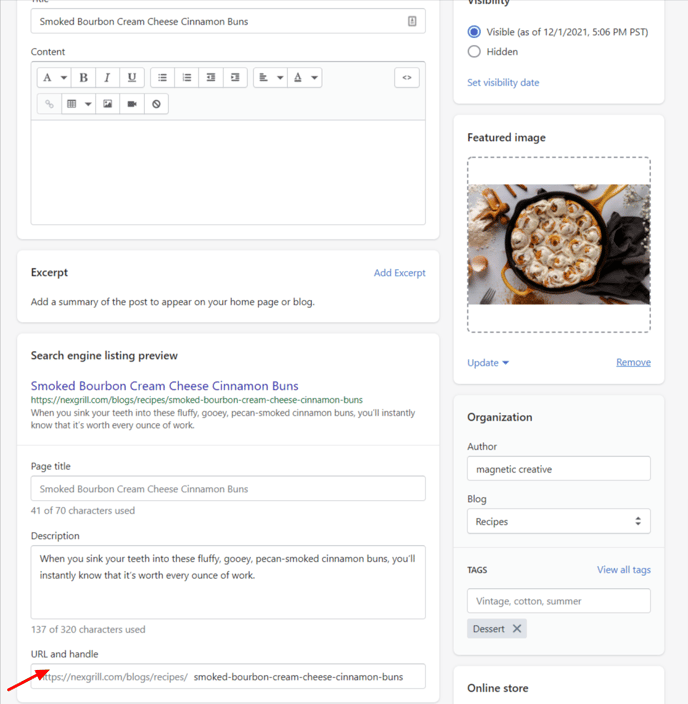
URL Slug
The URL slug is the section of a page's URL that comes after the core-domain.
i.e. https://nexgrill.com/blogs/recipes/smoked-bourbon-cream-cheese-cinnamon-buns
URL slugs should always include the target keyword, and be as short as possible (the shorter the better!)
Properly optimized URL slugs should also avoid the following stop words:
-
- the
- a
- is
- with
- and
- or
- but
Where Does Your URL Slug Go in the Shopify Blog Editor?
Optimize All Images (Compress & Tag)
Image Compression
One of the key hindrances to site technical performance and page load speed is having images with excessively large file sizes placed onto web pages.
All images placed onto web content should be compressed to under 300kb for hero images, and ideally under 100kb for all in-text images, when possible.
Image compression should typically be handled by a designer before packaging images to be used for content population, but if you find yourself with images over 300kb - here's how you can compress them.
Using Photoshop:
- Open the image in Photoshop
- Go to File > Export > Save for Web > Legacy
- Notice the file size in the bottom left corner of the image preview window
- If the image is a JPEG:
- Reduce the "Quality" slider until the image is under 300kb for hero images, 100kb for in-text images
- If the image is a PNG:
- Determine if the image actually needs to be a PNG (transparent background)
- If Yes, change the preset from PNG-24 to PNG-8
- If file is still too large, reduce the image's dimensions
- If No, change the preset to JPG and reduce Quality if file is still too large
- If Yes, change the preset from PNG-24 to PNG-8
- Determine if the image actually needs to be a PNG (transparent background)
- Click Save & Save the image to your computer with a file name that accurately represents what is being shown in the image
Not Using Photoshop:
- Upload the uncompressed image to a site like (https://imagecompressor.com/)
If you are unable to get an image properly compressed without reducing image quality, reach out to a designer/team lead.
Image File Names
All image file names should follow a lower case & hyphen case format.
i.e. ideal_meta_description_length_example.png
Image Alt Tags
Alt Tags are bits of text placed on an image when it's uploaded to the internet.
Google is able to read aloud these alt tags when accessibility features are utilized by a vision impaired site visitor.
These tags are an essential part of proper SEO practices as Google places significant importance on site accessibility.
When writing alt tags, the text should accurately describe what the image portrays for someone who is visually incapable of viewing the image.
Image Alt Tags should be in title case & never include any hyphens.

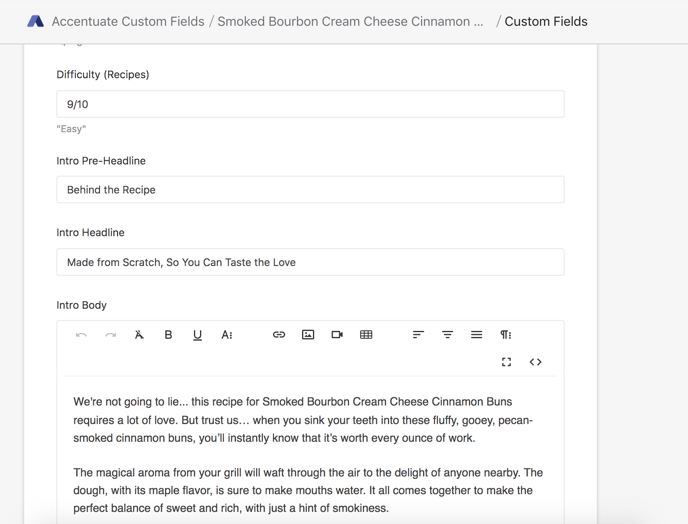
Staging Content in Custom Fields
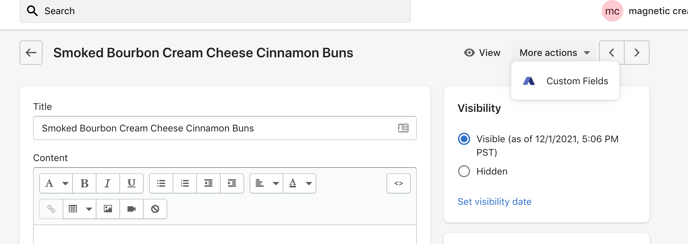
For some clients, the majority of the actual written content for a Shopify blog post will be placed into the Custom Fields editor, accessed via the More Actions drop down (see above).
As these are "custom" fields, the layout and structure of this back-end editor will vary between Shopify stores.
However, blog templates should always be formatted with the specific store's Custom Fields in mind, to ensure that content population is a smooth and confusion-free process.
When copying content from a Google or Word Doc over into Custom Fields, here are some things to keep in mind:
-
- To avoid carrying over any formatting from the copy doc, make sure you are pasting w/o formatting. Key commands to do this are Ctrl+Shift+V (Windows) or Command+Shift+V (Mac)
- Bullet points and numbered lists will typically not carry over correctly as the formatting from the doc on the list itself will differ from the formatting of the custom field. Always re-create the lists within the custom field using the built-in text options.
Content Staging Checklist
Now that we've covered all the individual components of staging an SEO optimized blog in Shopify, let's compile them into an easy to follow list.
- If not already completed, fill out the SEO Blog Template
- Receive Approval on Completed Template
- Open the Shopify Store > Go to Online Store > Blog Posts > Add Blog post
- Write Your Page Title in the "Title" field of the Shopify blog editor
- Write Your SEO Title in the "Page Title" field
- Write Your Meta Description in the "Description" field
- Write Your URL Slug in the "URL and handle" field
- Place your Featured Image into the "Featured Image" field
- Select the image and write your Alt Text into the "Image alt text" field
- Save your work thus far by clicking the green "Save" button in the top right corner of the Shopify blog editor
- Access the Custom Fields editor by selecting More Actions > Custom Fields
- Begin inputting content from your blog template or copy doc into the associated custom fields**
- Ensure any content being copy/pasted over is done so without carrying over formatting by using Crtl+Shift+V (Windows) or Cmd+Shift+V (Mac)
- Ensure all images being used have been compressed below 100kb and have alt text
- Once all content has been entered, press the Save button or Ctrl+S (Windows) / Cmd+S (Mac)
- Return to the Shopify front-end editor page, and click Preview to review your work and identify any content/formatting issues
**Keep in mind that custom fields will vary from store to store and is not a 1:1 process. Make sure that you are paying attention to the description of each field and are copying over the correct content.
Now you know the process for publishing a blog an SEO optimized blog in Shopify, and all the necessary tactics that go into the content population process.
Always make sure you are previewing staged content and receiving publishing approval before any posts are pushed live.